

Lowrance HDS Live Review
We may earn a commission for purchases using our links. As an Amazon Associate, we earn from qualifying purchases.
Quick Overview
FEATURES
QUALITY
PRICE
Pros
Cons
When you’re ready to level up your fishing with elite tools, Lowrance has your back.
Today’s Lowrance HDS Live review, complete with information about the various models in the line, will show you how.
From dual-processing power to multiple sonar types, these fish finders go above and beyond to assist your craft.
Anglers fishing their usual lakes and new waters can learn what they need to pin down an area in these tools.
Lowrance HDS Live Review
Lowrance has been well-known for constantly bringing the latest technology to fishing since 1957. They aren’t going to let that reputation go, either.
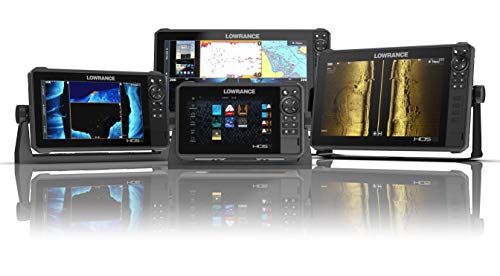
The Lowrance HDS Live is their recent addition to the community as they bring “live” sonar options to consumer-grade products.
Lowrance consistently reinvents how sonar can be used for fishing and makes it affordable for anglers to enjoy. That is precisely what the HDS Live line does for fishing devices!
This specific line is available in multiple screen sizes, allowing for high-speed sonar readings, which map the movement and reactions of fish.
While angling, this type of sonar would let you see how the fish responds, which is a revolutionary change for many.
Who Is This Product For?
The Lowrance HDS Live line of fish finders is perfect for anglers who want a comprehensive fishing tool. From CHIRP sonar to dual imaging to complete network accessibility, they show incredible diversity.
No matter what your goals are as an angler, this fish finder line by Lowrance likely offers tools to help you achieve them.
Additionally, these fish finders are good choices for those who want to fish in deep or shallow, fresh or saltwater.
The way the 3-in-1 imaging setup works permits all these conditions to be handled with great success.
Lowrance enthusiasts who love to see the latest from this famous company would also enjoy this device.
It showcases the best of Lowrance technology and what they are trying to bring to the modern market.
If you are brand new to angling, the features seen in this line might seem above-and-beyond what you need.
Going for something simpler can make some things more accessible. That said, beginners can learn a lot from using a tool like the HDS live fish finder.
Ultimately, your price point and specific needs will determine if this is a good fit, so find out more about its specifics to be sure.
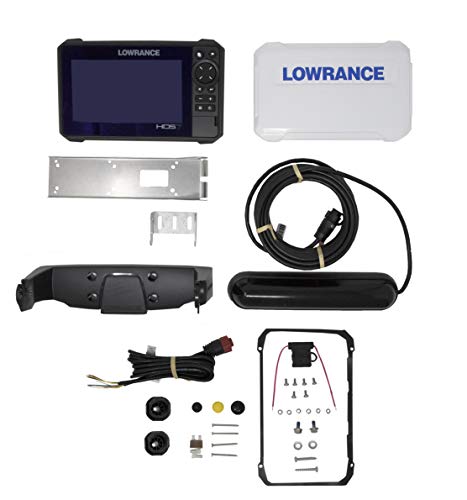
What’s Included?
Regardless of which size you choose for your HDS Live fish finder from Lowrance, the following is included:
- Lowrance Active Imaging 3-in-1 Transducer
- HDS Live bracket
- HDS Live sun cover
- HDS Live module
- HDS Live bezel
- HDS live SD-card door
- Power cables
- Screws and other mounting components
Essentially, Lowrance includes nearly everything needed to set up the transducer and fish finder.
With tools like a drill, screwdriver, and water sealant, you will have the necessary components to install your fish finder.
Before installing, though, read through the complete installation instructions for the fish finder and transducer to ensure you know what you are getting into and have a suitable fishing setup.
We also suggest reading our guide on how to read a Lowrance fish finder.
Anglers sometimes discover that they can't mount the fish finder as they intended it to, so take time to review this before jumping to installation.
Overview of Features
Let's cover some of the primary features seen in the HDS Live line. Each size of the models included in the line shares most of these features:
- 6-in-1 Screen Interfacing
The smallest screen size available on the HDS Live is seven inches, and the largest is sixteen inches.
All of these customizable modules can show up to six different screens at one time.
For example, you can view the DownScan imaging, SideScan imaging, and CHIRP sonar all at once.
Choosing which screens you view helps to customize your angling experience.
You can see exactly what you need to know to do your best fishing without constantly changing the screen to gather data.
Of course, you can also choose to just split the screen between two or stick to a straightforward screen if that is your preference.
The key is that you can change and customize as needed for your day on the water.
- High-Quality Screen Resolution
The screen is excellent for more than just being a split-screen model; it’s also easy to see.
Lowrance installed their SolarMAX screen in the HDS Live, and it is a great choice.
Whether it’s dark, foggy, or sunny, the screen is clear to read for everyone in the boat. There’s also a sun cover included, which adds a protection layer.
- Active 3-in-1 Imaging Sonar
While the HDS Live module is compatible with other transducers, Lowrance recommends using it with their Active 3-in-1 Imaging transducer.
This technology uses dual-channel CHIRP sonar, which covers a wide range of frequencies to give the most comprehensive view of what’s in the water.
For it to handle all incoming data, the HDS Live module is a quad-core processing machine.
It can quickly handle reading all incoming frequencies to give clear, accurate readings from the water.
- Mapping and Tracking
In addition to being pre-loaded with contour maps from the CMAP database of inland and coastal water, this device also has Genesis Live.
Genesis Live technology uses data from the transducer to create accurate and ongoing views of the water you are in currently.
That means you can create your own maps as you troll around, and you can determine what spots are best.
You can even share these spots on the SocialMap network or download maps from others of your favorite lakes.
The GPS tracking and map creation tools from Lowrance also work smoothly in the HDS Live modules.
- Compatible With Additional Technology
Lowrance fish finders match up well with a range of transducers, which goes beyond those included initially.
For example, the HDS Live range uses DownScan, SideScan, and CHIRP sonar for “live” images, but you could also add the LiveSight transducer to get another type of active imaging in the mix.
This device handles additional information well thanks to its high processing power, so you can add to it if you so desire.
Anglers still growing or unsure of what transducers they will ultimately enjoy can appreciate this functionality from Lowrance.
Setting up Your Fish Finder
Another useful thing to know beyond the details in today’s Lowrance HDS Live review is how to set up your fish finder.
Setting up these gadgets takes a limited amount of technical know-how, and most devices have extensive instructions.
Additionally, tech support from the brand makes a huge difference when trying to troubleshoot encountered issues.
Can You Set It Up Yourself?
The difficulty level of installing a fish finder depends on a few factors, such as:
- Where you plan to mount it
- What type of mounting bracket you want to use
- What kind of boat you have
- What type of transducer you have
For example, installing a through-hull transducer on your own is ill-advised unless you have experience doing so. A professional would be more capable of handling that installation.
On the other hand, flush-mounting a fish finder is doable with basic saw and drilling skills.
Before you start anything, make sure to look at the fish finder you select to see what is required for installation.
If you don’t have the tools or know-how to do it yourself, consider asking an experienced friend or professional for assistance.
How Much Does Installation Cost?
If you don’t feel like installing the transducer and module yourself is the best idea, that’s okay!
It’s possible and okay to have a professional do the work instead, especially if you need to cut through your boat.
Depending on your location and type of installation needed, most professional costs will run under $500.
Ask around at your local docks to see what other boat owners and anglers have done to get their setups in place.
They can likely recommend local experts who will help you get your fish finder in the water!
Location: Flush-Mounted Versus Binnacle-Mounted
Another thing to determine is whether you plan to flush mount your fish finder or mount it with a bracket on the binnacle.
Mounting a fish finder flush requires you to cut through the boat or dashboard, which can be more intimidating. On the other hand, using a mount can take up more space and requires a mount.
When it comes to the Lowrance HDS Live line, either mounting style is possible, but a mount is included with the module.
Many anglers choose to use this mount and set up their fish finder on it with ease. Take some time to determine where on your boat you can comfortably have the fish finder mounted.
Mounting the Fish Finder
When mounting flush, you’ll need to get the appropriate hole safely drilled and smoothed out before you can drop the fish finder into place.
However, for both flush-mounted and binnacle-mounted devices, make sure to include sealant as part of your process.
Once you have the necessary holes drilled or cut open, put a bit of sealant around the holes before continuing.
That will help prevent any water leakage and corrosion to the devices in use.
Setting Up the Transducer
If your boat does not yet have a transducer installed, you will also need to set it up.
Inboard boats often have transducers installed through the hull to avoid disruption from turbulence.
That said, many anglers find that the best way to DIY your transducer installation is to go with a transom-mounted transducer.
The transom, which is the vertical part of the boat’s rear, is easier to work on. Installing the transducer at the transom with a mount is not very difficult as you only have to drill a few holes.
Remember, though, that you need to use the appropriate water sealants when working below the waterline.
Also, make sure to check that your cables will be long enough to work properly before you mount the transducer.
Installation in Action
Learning how to install a fish finder and transducer for the first time can be confusing for all anglers.
Depending on your level of technical know-how, the process may either make sense or need further clarification.
No matter which category you are in, seeing the process of an installation on video can be a big help.
The video below showcases one angler’s journey to install their HDS Live 12” module.
Please pay attention to how they prepare for the installation, what they mention as most important, and how long it takes.
With the proper preparation, you’ll be able to install your own as well:
Alternatives
While the Lowrance HDS Live line is full of fantastic options, the models included are not going to suit every single angler.
Whether you want something better for beginners or something that takes a more straightforward approach, there are many others to choose from in the market today.
Anglers wanting a simple introductory fish finder may enjoy what the Garmin Striker Plus 4 offers at entry-level prices.
On the other hand, the mid-range Humminbird HELIX 7 module balances accurate fish finding with easy operation in a well-packaged deal.
Fish Smarter With This Fish Finder
With the details provided by this Lowrance HDS Live review, there’s no doubt that this fish finder line is an elite set of fishing tools.
The models included exhibit a higher fishing tech level than what many anglers have ever seen, but the tech really pays off.
The multiple ways that fishing has been improved by Lowrance technology include advanced sonar, easy routing, and a learning curve anyone can handle.
Regardless of how you love to fish, these high-quality tools from Lowrance provide fishing boosts that you don’t want to miss.
Make the most of your time on the water, and know exactly how to track what you’ve discovered with the right gadgets.
Start fishing smarter with one of the best fish finders you’ll find on the market today!